To connect the Amazon EC2 instance using Putty, first we have to find the instance’s public DNS. Right click on the instance’s name and click on Connect in AWS console.


Copy the instance’s public DNS.
To connect to the instance, we will need the Key Pair, which was used while creating the instance. For details about creating instance and key pair, read my post http://itinfrablog.mkcl.org/?p=3448
In this example I used a key pair named MKCL_New. But problem is that Putty do not support the private key format generated by Amazon EC2. So we have to convert the private key into a format that is understood by Putty. Putty has a tool called Puttygen which can do the task of key conversion. If you do not have puttygen tool, you can download it from http://tartarus.org/~simon/putty-snapshots/x86/puttygen.exe
Run the puttygen tool, and click on Load button to load the EC2 private key

Browse and select the EC2 private key. Remember to select All Files (*.*) in Files of type list, as by default puttygen only displays PuTTY Private Key Files (*.ppk). In my case I have selected the MKCL_New.pem key that I used while creating the instance. Click Open to open the private key.

After putty loads and imports the key into its own format, it will give the alert message Successfully imported foreign key

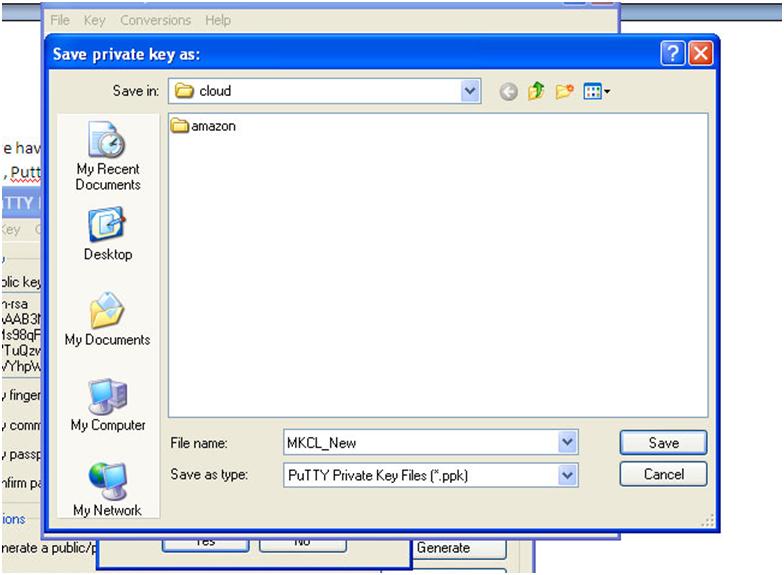
Now we have to save the imported key, so that it can be used with putty. Click on Save private key button, Puttygen will give alert, just ignore it and click Yes button.

Save the key as the same name as the EC2 key, the extension of the key will be ppk. In my case I saved it as MKCL_New.ppk

Now we have the private key, we can use Putty to connect to the EC2 instance. Open Putty and go to Connection -> SSH -> Auth. In SSH authentication settings click on Browse button to open the Private Key that we just created using Puttygen.

In my case I opened the MKCL_New.ppk file.

Go to Putty’s session settings and enter the instance’s public DNS or IP address and click Open.

One point to remember here, by default the instance will not allow us to login as root user

So use ec2-user’s login to connect to the EC2 instance.

That’s it, we are connected to the EC2 instance .
.


Copy the instance’s public DNS.
To connect to the instance, we will need the Key Pair, which was used while creating the instance. For details about creating instance and key pair, read my post http://itinfrablog.mkcl.org/?p=3448
In this example I used a key pair named MKCL_New. But problem is that Putty do not support the private key format generated by Amazon EC2. So we have to convert the private key into a format that is understood by Putty. Putty has a tool called Puttygen which can do the task of key conversion. If you do not have puttygen tool, you can download it from http://tartarus.org/~simon/putty-snapshots/x86/puttygen.exe
Run the puttygen tool, and click on Load button to load the EC2 private key

Browse and select the EC2 private key. Remember to select All Files (*.*) in Files of type list, as by default puttygen only displays PuTTY Private Key Files (*.ppk). In my case I have selected the MKCL_New.pem key that I used while creating the instance. Click Open to open the private key.

After putty loads and imports the key into its own format, it will give the alert message Successfully imported foreign key

Now we have to save the imported key, so that it can be used with putty. Click on Save private key button, Puttygen will give alert, just ignore it and click Yes button.

Save the key as the same name as the EC2 key, the extension of the key will be ppk. In my case I saved it as MKCL_New.ppk
Now we have the private key, we can use Putty to connect to the EC2 instance. Open Putty and go to Connection -> SSH -> Auth. In SSH authentication settings click on Browse button to open the Private Key that we just created using Puttygen.

In my case I opened the MKCL_New.ppk file.

Go to Putty’s session settings and enter the instance’s public DNS or IP address and click Open.

One point to remember here, by default the instance will not allow us to login as root user

So use ec2-user’s login to connect to the EC2 instance.

That’s it, we are connected to the EC2 instance
জয় আই অসম,
প্রণব শর্মা
5 comments:
Hi,
I followed your steps and i can only login the first time i try. After i exit i can never login again...do you have anyu idea why this happens?
Thanks in advance
Hi Paulo,
You may need to change the Public DNS each time you want to reconnect to the EC2 using Putty. Each time you restart your EC2 instant, a new Public DNS is generated.
Also, double check your security group for your EC2 instant. For some reason the "Source" for the SHH connection is sometimes automatically changed to "Custom IP", make sure you changed it to "My IP" or, if you want, to "Anywhere".
I hope this solves your problem.
Tarek
Nice blog
Thanks for sharing with us
Cloud Data Masters
Upgrade your career clinical data mange ment from industry experts gets complete hands on servicess, on our sclinbio.
Very nice I will try it…but could work with this is very good domain love it https://sclinbio.com/
Post a Comment