CopyDisable

Monday 7 November 2016

Private Docker Registry on Ubuntu

Normally the docker tool uploads/downloads docker images from docker public registry called Docker Hub. Docker hub lets us upload our images free of cost and anybody can access our images as our images our public. There are ways to configure our own registries from where we can pull docker images.
The benefits of having private registries are:
  • We can keep our private images as private, so that nobody from outside have access of our private images.
  • We can also save time by pushing and pulling images locally from our own WAN/LAN, instead of pushing and pulling over the Internet.
  • We can save Internet bandwidth by keeping commonly used images locally in our registry.
Setting up a private registry is very simple in Ubuntu. We can download the registry container image from the Docker Hub and use that image to start our own Docker registry service.
In this document I am going to write about a very basic registry on Ubuntu 14.04 without any built-in authentication mechanism and without SSL.
I will take two docker nodes server1(IP 192.168.10.75) and server2(192.168.10.76), in the first node server1 I will deploy the docker registry container and from the second node server2, I am going to pull images from our own registry.
Now lets do the handson.
Download the registry image from docker hub.
docker pull registry:latest
image
Let’s run the registry docker container, the registry container exposes port 5000 on the node server1, so that docker clients outside the container can use it.
docker run --name myregistry -p 5000:5000 -d registry:latest
image
Next we will pull some images from docker hub on to server1, and then we will push these images into our own docker registry (container with name myregistry). For this example we will download alpine and hello-world images from docker hub.
docker pull alpine
docker pull hello-world
image
Our two images alpine and hello-world are available in server1, so we will push these two images into our registry.
Before pushing the images into our registry, we have to tag the images with the tag of the local registry to which we are going to push these. Without tagging if we try to push an image, we will get image does not exists error.
image
Use docker tag command to give the image a name that we can use to push the image to our own Docker registry:
docker tag hello-world localhost:5000/hello-world:latest
docker tag alpine localhost:5000/alpine:latest
image
Now let’s push our alpine and hello-world images into our registry
docker push localhost:5000/hello-world
docker push localhost:5000/alpine
image
We can check the images available in our registry by running the command:
curl <repository>:<port>/v2/_catalog
curl localhost:5000/v2/_catalog
image

Our private registry is ready, now we will pull the images from another docker node server2 (IP 192.168.10.76).

When we try to pull the image from our new registry (server1 with IP 192.168.10.75), we get error:
Error response from daemon: Get https://192.168.10.75:5000/v1/_ping: http: server gave HTTP response to HTTPS client
image
To resolve the error, edit/create the file /etc/docker/daemon.json and add the following line:
{ "insecure-registries":["<registry>:<port>"] }
pico /etc/docker/daemon.json
{ "insecure-registries":["192.168.10.75:5000"] }
image
After adding the insecure registry line restart docker process.
service docker restart
image

When we use the registry on localhost the communication is in plain text and no TLS encryption is needed, but when we connect it from another node it communicates using TLS encryption. So by adding our new registry into the insecure-registries, we informed docker to communicate without TLS encryption.

Now let’s pull our images:
docker pull 192.168.10.75:5000/alpine:latest
docker pull 192.168.10.75:5000/hello-world:latest
image
Congrats! We have configured our own registry and pushed/pulled images from it successfully Smile.

Tuesday 13 September 2016

Creating a docker image from a running container

We can create docker image in two ways:
1) From a running container
2) Create an image using Dokcerfile
In this document I will write only about creating an image from a running container, in future I will write about the second method of creating docker image using Dockerfile (if time permits Winking smile ) .
I will give one example, I will deploy the world’s simplest node.js application in a docker container. I will take lightweight Alpine Linux as base image for my Node.JS application image.
First I will pull the Alpine Linux image from docker hub.
# docker pull alpine
clip_image002
Next I will install Node.js in a running Alpine Linux container. For that I am creating one interactive session to an alpine Linux container.
# docker run -i -t alpine /bin/shclip_image003
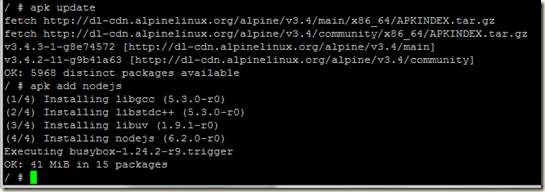
Install Node.JS using Alpine Linux’s package manager apk
clip_image005
Verify node installation:
clip_image006
To deploy the sample Node.JS application, first I will create a directory for this sample application
# mkdir myapp
# cd myapp
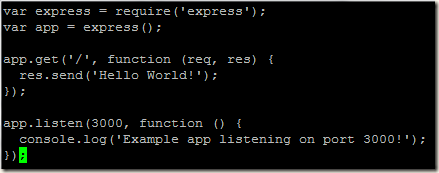
Sample Node.JS application
# vi myapp.js
var express = require('express');
var app = express();
app.get('/', function (req, res) {
res.send('Hello World!');
});
app.listen(3000, function () {
console.log('Example app listening on port 3000!');
});


clip_image007
/myapp # vi package.json
clip_image008
# npm install
clip_image009
We will need the container ID to create our new image, if we run the hostname command in the container it gives us the container ID.
clip_image010
Now exit from the container shell and run the docker commit command to create the new image.
# docker commit --change='CMD ["node", "/myapp/myapp.js"]' -c "EXPOSE 3000" 24b1763f7d0d pranabsharma/nodetest:version0
clip_image012
Our new image is created and if we run the docker images command, we can see the newly created image.
clip_image014
We will run our new docker image:
# docker run -p 3000:3000 -d bf4d3f980e76
clip_image016
Checking our Node.js app from browser:
clip_image018


Friday 26 August 2016

How to run MySQL docker container with populated data

Suppose we have to run few MySQL containers each containing data for different applications. Each MySQL docker containers should be initialized with databases and data while we run the container for the first time.
In this example I am going to run two MySQL docker containers one for our techsupport application and the second one for the blog application.
First I will download the MySQL 5.5 docker image.
# docker pull mysql:5.5
image
We have the MySQL 5.5 docker image. Before running the image, I will copy the mysqldump files for both the applications.
I have created 2 directories for copying the SQL scripts for the two applications:
# mkdir -p /docker/scripts/blog
# mkdir -p /docker/scripts/techsupport

Next I copied the SQL files into the respective directories:
# cp /root/MySQLDocker/sql/blog.sql /docker/scripts/blog/
# cp /root/MySQLDocker/sql/techsupport.sql /docker/scripts/techsupport/

Now we are ready to run our MySQL docker containers.
First I will run the docker container for techsupport application.
# docker run --name mysql-techsupport -v /docker/scripts/techsupport/techsupport.sql:/docker-entrypoint-initdb.d/techsupport.sql -p 3310:3306 -e MYSQL_ROOT_PASSWORD=root -d mysql:5.5
image
The key of populating data in the MySQL container is to specify docker-entrypoint-initdb.d. When we start a MySQL container for the first time, it will execute files with extensions .sh, .sql and .sql.gz that are found in /docker-entrypoint-initdb.d directory. I will mount the SQL script file /docker/scripts/techsupport/techsupport.sql to the /docker-entrypoint-initdb.d/techsupport.sql file in the MySQL container using the -v flag, so that the techsupport.sql file gets executed when the container runs for the first time.
After the MySQL container is started for the first time, if we inspect the running processes we can see that the mysql client is also running and executing the statements of the SQL file. We can’t connect to this MySQL server from outside till the time the SQL script execution is completed (we can see that mysqld is running with --skip-networking option)
image

Next I will run the MySQL container for blog application
# docker run --name mysql-blog -v /docker/scripts/blog/blog.sql:/docker-entrypoint-initdb.d/blog.sql -p 3320:3306 -e MYSQL_ROOT_PASSWORD=root -d mysql:5.5
image
Now both the MySQL containers are running, one is on port 3310 and the second one is on port 3320 of my server.
image
Let’s inspect whether the databases got created in our containers.
First connect to mysql-techsupport container and check:

# docker run -it --link  mysql-techsupport --rm mysql:5.5 /bin/bash
image
Yes from the screenshot we can see that techsupport database got created.
image
Data is also present, so our MySQL container is populated with the required data Smile.
Let’s check the second container mysql-blog
image
image
Second container is also populated with data Smile.

Note: In the above screenshot, I have connected to the MySQL server using the IP address (mysql -h 172.17.0.3  -u root -proot). To get the IP address we can run env or we can use the environment variable MYSQL_BLOG_PORT_3306_TCP_ADDR instead of IP address.
image


Friday 24 June 2016

MongoDB inaccurate count() after crash

One of my MongoDB dev database server had crashed due to abrupt power failure. I was running MongoDB 3.2.4 with WiredTiger storage engine. I had one user collection in my test database; and at the time of server crash, inserts were going on from a loop into this collection.
I started back the server; MongoDB did recovery from last checkpoint and it started fine.
2016-06-24T09:53:47.113+0530 W - [initandlisten] Detected unclean shutdown - /data/db/mongod.lock is not empty.
2016-06-24T09:53:47.113+0530 W STORAGE [initandlisten] Recovering data from the last clean checkpoint.
After the server had started, I tried to check the number of documents that got inserted into my users collection, so I run the db.collection.count() and seeing the result I was stunned.
> db.users.count()
7
> db.users.find({}).count()
7
clip_image002
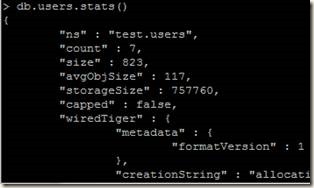
Then I run db.collection.stats() that too also confirmed the previous results
clip_image004
This result was not correct, as previously I had 7 documents in the users collections (before the insert operation was started). At the time of crash as the insert operations were going on, so the number documents should have increased. So where the document from my new inserts had gone????? Immediately I felt the fear of data loss or corruption.
I run aggregate method with $group to check the number of docs and result was encouraging:
> db.users.aggregate({ $group: { _id: null, count: { $sum: 1 } } })
{ "_id" : null, "count" : 27662 }
clip_image006
My data was there, so the fear of data loss went away Smile . That means the issue was with the count() and stats() results.
Then I checked the MongoDB documents and I found that, if the MongoDB instance using WiredTiger storage engine had unclean shutdown, then the statistics on size and count may go wrong.
To restore and correct the statistics after an unclean shutdown, we should run the validate command or the helper method db.collection.validate() on each collection of the mongod.
Then I run the db.collection.validate() method on my users collections:
clip_image008
After that I run the count() method, it gave me correct results:
> db.users.count()
27662
clip_image010
Tip: Don’t always rely on count() or stats() methods, run aggregate() with $group to get the document count if you have any doubt. Also on sharded cluster, it is always better to run aggregate() with $group to get the count of documents.

Monday 30 May 2016

JOIN in MongoDB ? or JOIN’s kin? or something similar?

One of the sought after features in MongoDB was to have the ability to join collections. People working on RDBMS were very much familiar with joins and could not even imagine working without joins. The base of RDBMS is the relations, and join is one of the success factors of RDBMS. Also the join is the one of the major performance issues in RDBMS when we have large amount of data. MongoDB is based on document model, most of the time all the data for a record is located in a single document. So if the data is properly modelled in MongoDB the need for Joins can be avoided. For some requirements like reporting, analytics etc. it is possible that the data we need may reside in multiple collections. As MongoDB user base is growing and more and more users from RDBMS world are using MongoDB, so requirement of Join came out strongly. Starting with MongoDB version 3.2, one new aggregation framework operator $lookup was added. The $lookup operator performs an operation similar to a Join (left outer join). We can read data from one collection and merge the data with data from another collection. Prior to MongoDB 3.2, similar work had to be implemented in application code.
Let’s get our hands dirty with an example.
Suppose we have two collections:
users collection stores user’s information.
image
activity collection stores users activities.
image
Referring to RDBMS, we may think userID field in users collection as the primary key and userID field in activity collection as the foreign key Smile. So the link between these users and activity collection is the userID field.
Now suppose we got a requirement: “find username and city of the user performing each activity”. But the user’s detail information is stored in users collection, so we have to join the activity and users collections using the userID field to extract the required data.
It’s the time to leverage the power of $lookup operator. So our aggregation query will be:
> db.activity.aggregate(
{
"$lookup": {
from : "users",
localField : "userID",
foreignField: "userID",
as : "userInfo" }
})

image


from: Specifies the collection from the current database to be joined, in our example it will be the users collection.
localField: Specifies the field from the input documents, in our case it will be userID field of activity collection.
foreignField: Specifies the field from the documents of the “from” collection, in our case it will be userID from users collection.
as: Specifies the name of the new array field, each array contains the matching documents from the “from” collection. We are naming this array as userInfo.
image
From above output, we can see that the whole users document is stored within the userInfo array.
The data returned above is not looking cool, this is not the format in which we wanted the data. If we get data in the following format, it would be nice:
 UserID, Activity, UserName, City
So for that we have to use two more aggregation framework operators, $unwind and $project, let’s rewrite our aggregation query:
> db.activity.aggregate(
{
"$lookup": {
from : "users",
localField : "userID",
foreignField: "userID",
as : "userInfo" }
},
{
"$unwind": "$userInfo"
},
{
"$project": {
"UserID":"$userID",
"UserName" : "$userInfo.username",
"City" : "$userInfo.city",
"activity" : 1,
"_id": 0 }
}
)

image
Voila, required data is ready Thumbs up